Manage the Salesforce Connector
The Symphony Salesforce connector lets you access the data available in Salesforce. Obtain the connector server following this process: Obtain Additional Connector Servers
After the connector has been set up, you can create data source configurations that specify the necessary connection information and identify the data you want to use. See Manage Visual Data Discovery Data Source Configurations for more information. After data sources are configured, they can be used to create dashboards and visuals from your data. See Create Data Discovery Dashboards.
- Symphony Feature Support
- Connect to Salesforce in Visual Data Discovery
- Optimize Performance
- Manage the Salesforce Connector
- Manage the Salesforce Connector
- Manage the Salesforce Connector
Symphony Feature Support
Connector support for specific features is shown in the following table.
Key: Y - Supported; N - Not Supported; N/A - not applicable
Connect to Salesforce in Visual Data Discovery
This applies to: Visual Data Discovery
To connect Symphony to your Salesforce instance, provided the JDBC url, a Salesforce user name, and password or API token.
| Input Field | Description |
|---|---|
| JDBC Url | jdbc:salesforce://localhost;Endpoint=https://your_salesforce_endpoint/services/Soap/u/48.0 |
| User Name | Your Salesforce user name |
| Password | Your Salesforce user password |
Optimize Performance
The Salesforce connector is a raw data connector. Data retrieved from the data source is processed by the QueryEngine service. When you retrieve and manipulate large chunks of data, consider the following practices to improve performance speed:
-
Create your source using custom SQL and fusion source interfaces
-
Limit your query using a
WHEREclause andTOP -
Narrow your data retrieval by filtering your data
-
Speed your initial load time by defining a small time range on the Global Settings tab
Raw Data Cache
You can reduce the number of queries Symphony makes to the source and speed up data query execution by enabling raw data caching. When enabled, an Entity Data Cache toggle is added to the Source Creation work area. Enable and define a caching schedule. Contact Technical Support for assistance enabling this feature.
Connecting to Salesforce in Managed Dashboards and Reports
This applies to: Managed Dashboards, Managed Reports
This article shows you how to connect to Salesforce, which will allow you to add data visualization on top of your CRM system.
Main article:
Salesforce account
In order to connect to Salesforce, you need a Salesforce account that allows API access. For example, a Salesforce Developer account will work and you can sign up for one here: https://developer.salesforce.com/
Log in to your Salesforce account and check to make sure that you have access to CRM data such as Accounts or Contacts.
Next, open your user menu in the top-right corner of the Salesforce screen and select My Settings.
Go to the left navigation area and select Personal to expand its options.
You should see the option Reset My Security Token. Select this and then select Reset Security Token on the right.
Salesforce will send an email to you containing the new security token value. Check your inbox for this email and copy the text of the security token. You'll need this information to set up the data connector in Symphony.
Symphony Data Connector
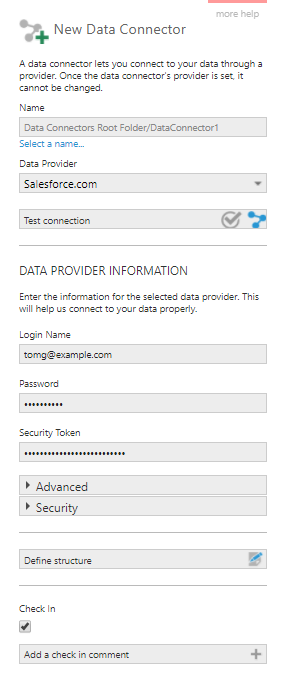
Create a new data connector, setting Data Provider to Salesforce.com.

You will need to supply the following credentials for Salesforce:
- Enter the Login Name for your Salesforce account. This will typically be the same as the email address for the account.
- Enter the Password for your Salesforce account.
- Enter the Security Token which you received previously via email.