Create a Keyset From a CSV File
This applies to: Visual Data Discovery
You can create a keyset from a CSV file. The CSV file must meet the following requirements:
-
The data values in the file must be in a single column.
-
The file must be UTF-8 formatted.
-
The file cannot contain more than 1000 rows.
-
The data type of the CSV values (number, time, attribute, etc.) must match the data type of the field to which the CSV keyset data will be applied.
To create a keyset from a CSV file:
-
Review a visual in the Visual Gallery or in a dashboard.
-
Select the filter icon on the visual or dashboard to access the appropriate filter sidebar.
- To access the visual filter sidebar, select its filter icon (
 ) or select Settings from the visual menu (
 ) and then select
  on the sidebar menu.
- To access the dashboard filter sidebar, select its filter icon (
 ). The dashboard-level filter icon is available only when all the visuals are from the same data source.
The Filters sidebar appears, showing any filters that have been applied.
- To access the visual filter sidebar, select its filter icon (
-
Select Add Filter.
-
Select a filter field on the Filter sidebar. Remember that the field data type must match the data type of the CSV data you will upload (for example, if the field is a numeric field, the CSV data must be also be numeric).
The Filters sidebar displays three tabs:
-
The Value tab allows you to select values for the filter.
-
The Wildcard tab allows you to specify a row-level wildcard filter for the visual.
-
The Keyset tab allows you to select a keyset for the filter or to upload a CSV file as a keyset.
 If your example uses numeric data, the tabs may vary. See Set a Numeric Field Filter.
-
-
Select the Keyset tab. The keysets and saved filters defined in your environment are listed.
-
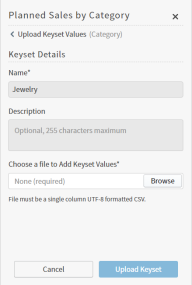
Select Upload Keyset Values. An Upload Keyset Values panel appears in the Filters sidebar allowing you to specify information about the CSV file and the keyset you are creating.
 If the upload file contains more records than are allowed by the Symphony environment configuration, the keyset will not upload and an error occurs.
 -
Enter a name for the keyset in the Name box. Because the keyset will be shared by all users of the Symphony instance, be sure to enter a unique name.
-
Optionally, enter a description for the keyset in the Description box.
-
In the Choose a file to Add Keyset Values box, browse for and select the CSV file containing the keyset values you want to upload.

-
Select Upload Keyset to upload the CSV file for the keyset.
If the upload occurs successfully, a message displays that the upload was successful and the keyset details appear in the Filter sidebar. The keyset is now available to all users of the Symphony instance.
-
When you are finished setting your filter values, select Continue and examine your updates. If they are correct, select Apply.