Apply a Row-Level Filter to a Visual
This applies to: Visual Data Discovery
You can apply row-level filters for the data in a visual. When more than one filter is applied to a visual (either via the visual itself or via a dashboard filter), the filter conditions are ANDed. In other words, both filter conditions must be met for the data to appear in the visual.
To apply a row-level filter to a visual:
-
Select the filter icon (
 ) on the visual or select
  on the sidebar menu. If the visual is in a dashboard, select Settings from the visual menu (
 ), then select
  on the sidebar menu.
 The Filters sidebar appears showing any filters that have been applied.
-
Three tabs are appear on the Filters sidebar, allowing you to create a row-level filter, a group filter, or a saved filter. If these tabs do not appear, select Add Filter to see them.
Tab Description Row The Row tab allows you to create a row-level filter, as described in the rest of this topic. Group The Group tab allows you to create and use a group filter. See Apply Group Filters. If you are using a KPI, raw data, histogram, or map markers visual, the Group tab is not available because all filters on these visuals are row-level filters. Saved The Saved tab shows saved filters that you can apply to the dashboard or visual. See Maintain Saved Filters.
-
Select the Row tab and then select the filter attribute, number, or time field you want to use from the list. The process of creating a row-level filter varies based on the type of field you select.
-
If you select an attribute field, see Set an Attribute Filter.
-
If you select a numeric field, see Set a Numeric Field Filter.
-
If you select a time field, see Set a Time Field Filter.
You can also select
 to access the Derived Field Editor or the Custom Metrics Editor to create or modify derived fields and custom metrics to be used as filters. See Access the Derived Field Editor from the Filters Sidebar and Access the Custom Metrics Editor from the Filters Sidebar.
 -
-
After the filter specifics have been defined, select Continue. The filter is applied to the selected (active) visual. Note that a number appears in a green circle next to the filter icon on the visuals to which the filter has been applied. The number represents the number of filters applied to the visual.
To view the filters applied to a visual, see Viewing the Applied Filters for a Visual.
Example
Suppose you want to learn what the planned sales are for different product categories for male customers in San Francisco. You might apply a series of row-level filters using the following steps.
-
On your sales visual, select Group (x-axis) and then select Product Category from the list. The visual data is grouped by product category purchases.
-
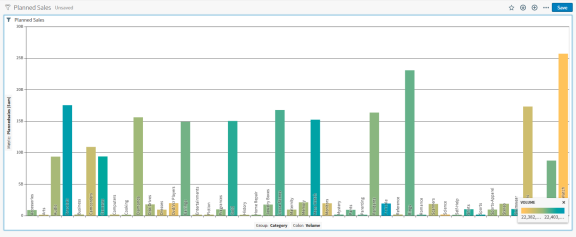
On your sales visual, select Planned Sales for the Metric (y-axis). Your visual might look like this:

-
Select the filter icon (
 ) on the visual.
 -
Select Add Filter, then on the Row tab, select City.
-
On the next page, select the Value tab and ensure Include is selected on the tab. Then locate and select San Francisco from the list of available attribute values.
-
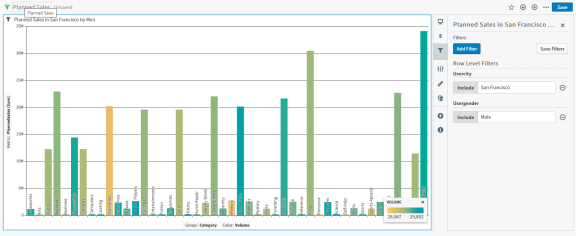
Select Continue, then Apply. Your filter is now displayed on the Filters sidebar and is applied to your visual. The visual shows all planned purchases in San Francisco by category.
-
In the Filters sidebar, select Add Filter again.
-
Select the Gender attribute on the Row tab.
-
On the next page, select the Value tab and ensure Include is selected. Then select Male from the list of available attribute values.
-
Select Continue, then Apply. The Filters sidebar shows both filters you have applied to your visual. The visual shows all planned purchases in San Francisco by men. The purchases are grouped by category and might look like this:

-
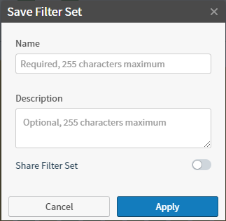
Filters are not saved automatically. To save your filter, select Save Filters on the Filters sidebar. The Save Filter Set dialog appears.

Enter a name for the saved filter and, optionally, a description. If you want to share your filter, slide the Share Filter Set switch on (to the right). This shares the filter with other users when they view dashboards created using that same source.