Design a Data Cube
This applies to: Managed Dashboards, Managed Reports
![]() You need to be a user with a Developer seat to create or edit a data cube.
You need to be a user with a Developer seat to create or edit a data cube.
Use the data cube canvas to create your data cube structures visually. Add structures, create joins, and define your ETL process.
The Data Cube Canvas
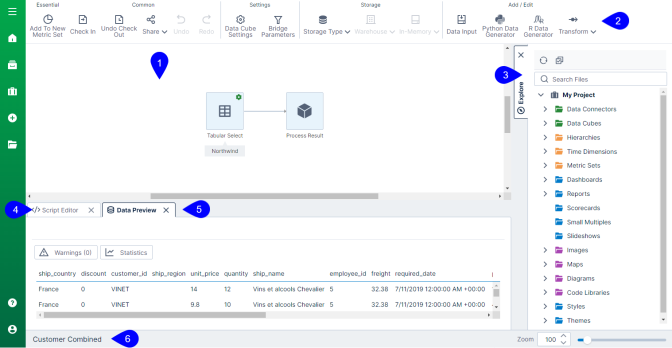
The data cube canvas is a large, scrollable work area you use to create your data cube. Toolbars that change based on what you have selected in the canvas run along the top of the canvas. To the right, an Explore window allows you to navigate through your data and add elements to the data cube. Along the bottom of the canvas area, Script Editor and Data Preview tabs allow you to affect and view the data generated by the process result of your data cube.

- The canvas. Drag data, structures, and transforms to create your data cube. Select elements and connect with joins to generate your process result. See Design overview.
- Toolbar. The options available in this toolbar change depending on the contents of the canvas and what elements you have selected.
- Explore window. Explore the data you have available, and optionally select items to drop onto the data cube canvas.
- Script Editor. Add custom queries to the data cube for SQL or MDX, Python or R, or DundasScript.
- Data Preview. Preview the data of a selected element in the canvas.
- The status bar. Shows the name of the current data cube and other controls. See Using the status bar.
Data Cube Canvas - Toolbar
The toolbar above the canvas changes depending on the nodes placed on your canvas, the items selected in the canvas, and if your data cube is checked in or checked out. Generally, most options are made unavailable when you view a checked in data cube.
| Section | Menu Option | Select this option to... |
|---|---|---|
| Essential | Add to New Metric Set | Add this data cube to a new metric set. |
| Common | Check In | Check in a checked out data cube. |
| Check Out | Check out a data cube for editing. | |
| Undo Check Out | Undo the check out of a data cube, returning it to a checked in state and removing all changes made since the last check in. | |
| Share | Open the Share work area and share this data cube as a link, adding users' access, or as an email. | |
| Undo | Undo your last action. | |
| Redo | Redo your last undone action. | |
| Settings | Data Cube Settings | Configure settings for the overall data cube, unrelated to specific transforms. Options vary based on your data cube storage type. |
| Bridge Parameters | Define a bridge parameter to promote a placeholder to a hierarchy. | |
| Storage | Storage Type | Select a storage type for this data cube. Options include None, Warehouse, and In-Memory. |
| Warehouse | Define settings for your Warehouse storage. Options include Build Warehouse, Schedule Warehouse, and Remove Schedule. | |
| In-Memory | Define settings for your In-Memory storage. Options include Build In-Memory, Schedule In-Memory, and Remove Schedule. | |
| Add/Edit | Data Input | Add a Data Input transform to the data cube. |
| Python Data Generator | Add a Python Data transform to the data cube. | |
| R Data Generator | Add an R Data Generator transform to the data cube. | |
| Transform | Add Common and Other transforms to the data cube. See Using Transforms. |
For more information about Data Cubes and data cube options, see: